Well, I’m finally done painting the kitchen cabinets. Let’s get straight to the before and, most importantly, afters!
Way Before (listing photos):


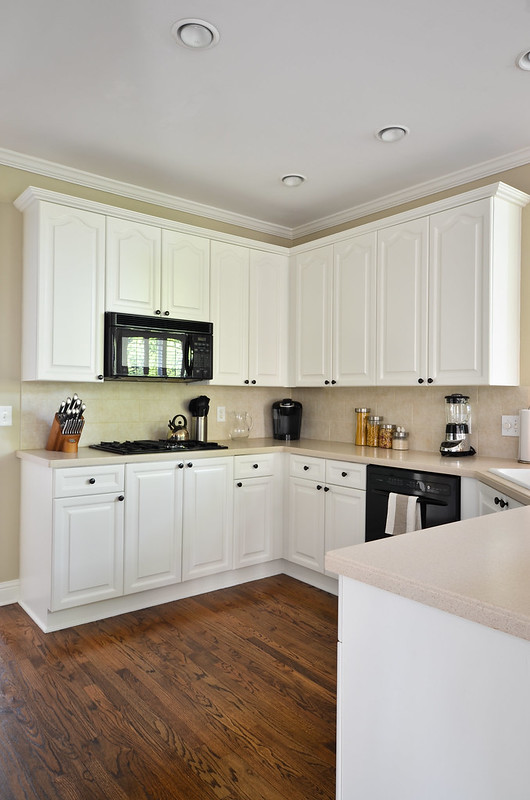
Later Before (after the walls had been painted and the floors refinished):

And finally, after:


And now for the important stuff…why did this take me so long? 😛
- Prep: I removed all of the doors and hardware and labeled each door with a number on a piece of masking tape. Instead of making an awkward spreadsheet that said door 1 = left side bottom drawer by sink, I just took a photo of the kitchen and overlaid the door numbers on top of it. All 35 doors and drawer fronts and cabinet frames were cleaned with Krud Kutter. The insides of most of the frames were taped off (although I’m not sure how necessary that really was), along with the areas around the appliances and where the baseboards meet the floor. I also filled in imperfections with paint-able wood filler and used caulk for gaps in the frame.
- Sanding: Doors and drawer fronts were sanded using a combination of Ryobi handheld detail sander, sanding blocks, and sand paper sheets at 120 grit. Each door took about 30 minutes due to all of the tiny crevices and details. This was followed by an application of deglosser, and then finally I used tack cloth to remove all of the remaining sawdust before priming.
- Priming: For the cabinet frames I used a 4-inch high density foam roller to apply 2-3 coats of Zinsser cover stain oil-based primer. For the doors and drawer fronts, I used the same primer but in a spray can. Home Depot sells a 6-pack of these cans online only, but it’s a good deal because each can is 16 ounces (opposed to only 12 ounce cans available in stores for about the same price). I ended up doing 2 coats of spray primer, and even 3 coats in some places due to tannin bleed and trying to cover the grain. After I was done priming, I used 220-grit sandpaper to lightly sand away any final imperfections before painting. Of course that is again followed by tack cloth to remove any surface residue.
- Painting: Finally the fun part 🙂 Each side of the doors and drawer fronts received 2 coats of Benjamin Moore Advance paint in White Dove (satin finish). I applied it using my awesome HomeRight Finish Max HVLP paint sprayer. This sprayer was appealing to me because it is very reasonably priced (~$65!) and doesn’t need an air compressor. I was pretty happy with it and didn’t have any issues with drips or runs. I didn’t need to thin the paint at all and only had trouble with globs when I forgot to regularly wipe the air tip after paint had began to dry around the nozzle. There are some tiny air bubbles, but I’m not really sure if that was from the sprayer or the paint itself. In total I used just under 2 gallons of paint (a little pricey at $55 per gallon, but worth it).
- Hardware: I replaced the brushed nickel knobs with oil rubbed bronze ones from Home Depot to add a little more contrast. I debated keeping the brushed nickel, but the pantry door has ORB hardware and hinges.
So now that the cabinets are done, the counter tops look not so awesome. They are not in the best shape either (they’re Corian, but have a ton of stains and stratches). It’s an endless cycle, isn’t it? I would love to get honed Absolute Black granite and under cabinet lighting, but literally everything else in the house seems to be currently falling apart. That will be on the back burner for a little while until we can stop the rain from coming through the roof :(.
This project was a crazy amount of work, but I am happy with the outcome. But really, next time when I tell our Realtor that I want white kitchen cabinets, I am going to stick to my guns…
*Some links on this page contain affiliates

Pingback: 2014 Home Goals | To Newlywedism and Beyond...
How did you deal with the inside of the drawers and cabinets?
Luckily the insides of the drawers and cabinets were already white 🙂
Ok, last question, did you end up putting a sealant on this? If not, have you seen any ware or wish you had?
Nope, the paint (Benjamin Moore Advance) doesn’t require any polyurethane or any type of top coat. So far they are holding up well!
Pingback: Kitchen Facelift Update | To Newlywedism and Beyond...
Hello!
My husband and I are starting to paint our kitchen cabinets and I’m having a hard time deciding on which shade of white to use. I’ve read that White Dove can be tricky if your trim isn’t the same color. Is your trim also White Dove, if not can you notice a difference between the shades? Are you happy with White Dove?
The trim is not white dove, it’s a tiny bit lighter. I notice a difference but it’s not jarring. It may be more of a concern to you if your trim is pure/bright white.
Hey there, your cabinets look great and wow what a lot of work. Wanting some feedback on how the painted cabinets have held up with shipping especially around the door handles and the drawer pulls where your fingers hit the paint. Thank you for your reply.
A few scuffs here and there but overall they have held up really well!
Your kitchen renovations look great. What color did you stain your wood floor?
DuraSeal Coffee Brown
What color stain did you use on the floors?
It’s DuraSeal Coffee Brown.